Raku firing

Had an excellent day raku firing in the gardens behind York Art Gallery as part of the 2018 Day of Clay .  I was busy so didn’t take many pictures but here are the four octopuses each with a different choice of pattern chosen by the girls holding them, by a friend, and one by me, plus my cow and a few pots which didn’t get picked up.


The cow was a one off, solid thing, which may not have survived the first firing but it worked fairly well [except the white glaze was too watery].  Maybe I’ll make a larger one [and this time have reference pictures and not rely solely on memory]. And if that works then maybe make a mould for the next public raku firing.

Chameleons, Clive James, and an Octopus

Ed, my tutor, will be demonstrating raku firing at CoCA in York, in early October.  Rather than be limited to bowls, I have agreed to make some figurines for people to glaze and then we raku fire them!

Lots of ideas and the first to pursue was the chameleon.  I wanted to make a two part mould so quite a few could be produced by pressing clay into the mould.  The design needs to have fairy shallow curves and no undercuts [ie bits where clay would get stuck when trying to get it out of the mould].  Got some pictures of Common Chameleons from the internet and I set about making an original; here it is in the mould making process:-

… Here it is out of the mould making process [you can see it survived almost unscathed],

and here is a very quick press moulded chameleon using the plaster contaminated clay.

You can see that there is a flashing of clay where the two mould pieces meet and the clay is caught between them.  This excess clay can be cut away the a knife.

Meanwhile, we came across an interview between Mary Beard and Clive Anderson on the BBC.  Clive James’ head interested me and over three days last week [probably 8hours of work] I made this,

But then it was back to the figurines and I made an octopus in the evenings.

Next i make the mould and then lots of copies.  I’ll provide an update after the event at CoCA.


Bust of Troy

Some of you will be aware that I’ve been getting involved with Soldiers’ Arts Academy and via them I was introduced to Troy, a British Army veteran living in Yorkshire.  I was privileged to meet him at his house, chat, take photographs, and some measurements for a bust.

I did most of the work on the bust before the summer arrived and have spent most of the last two days fine tuning what I wanted and hollowing it out so it can be fired.  Often it is best to have some sort of armature to help hold the clay up as you build and, if you use a fair amount of paper, you can keep the weight down.  The armature and excess clay need to be removed otherwise the clay will shrink around the armature and cause cracks [and even if it didn’t college would not allow the whole lot to go in the kiln].  The excess clay is taken away to give a quicker drying time and hopefully less likelihood of breaking in the kiln.  I thought I’d show something of the process.

Here’s the completed bust before removal of the armature and hollowing, the line on the right of Troy’s head is from surgery.

I cut a segment out of the top of the back using an old ham slicing knife – long thin blade – and started to hollow out; to get feel of how soft the clay was.  Next I cut down the armature through the skull and revealed the paper around the wooden post [there was more paper where the head is].   the segments cut away need to be carefully stored  while the hollowing takes place. After lot of careful tearing, cutting, and scooping, the main part was almost ready to have the cut away portions replaced.

The cut surfaces are cut into with a knife, sprayed with water and costed in slip [watery clay of the same sort as used for the modelling] and some very soft clay was also added at the inner margins.  The cut sections are offered up, and gently squeezed into place.  The outer surface [and a few millimetres deeper] is re-worked to try and get the portions to stick and to disguise the earlier cut.  The process is rather messy and I only took pictures of putting on the last piece. You may notice some holes in the piece which forms the upper back, these were made by a BBQ skewer to try and ensure that any air pockets might be opened to a free surface and not explode in the kiln [I did the same to the big piece but after the photos above were taken].

Then I had to tidy up – looked like a rodent’s nest on the table along with my tools.

By the way, the mark on the back of the neck is intentional as Troy has a crease there [but I may soften it off a bit in the next day or two].

I now leave the piece to continue to dry [and hopefully not warp] and then it is destined for the kiln.

Overall, quite and enjoyable process and I look forward to doing some more.


…. Bit of an update

I’ve put these projects up on this blog in earlier incarnations but now that they are substantially finished, I thought that it was time for an update.

“Inspired by…  ” project has been fired to be stoneware.  I coloured the anvil, and log, and made test pieces for colouring the figure; various oxides with tin [top] or without tin [bottom & blue bits to left of photo].

Whilst the palette looked good, I was reluctant to colour the figure because I wasn’t confident that I could create the right values of tone where I wanted them.  Moreover, I wasn’t sure that I could apply the oxides without dripping on other bits.

Once assembled, the consensus was that the ceramic log let the work down a bit so I was helped by Pete at college to get a good slice of oak to serve as the log [I’ve also finished the hammer between pictures].

Sometime, the piece will go to the gallery on the North Yorkshire Moors, until then it will sit on the mantlepiece.

“York Garrison Memorial” project was suspended while we went to Indonesia and I didn’t start again on return because of half term, going to Amsterdam for two weeks, end of term, an internal debate about the project, and then there was a suggestion of funding the casting of the figures.  Enthusiasm thus renewed, I set about revising the roman figure, which is now substantially complete.


In September, I had made a half volume head of SSgt Susie, who had modelled for me so I could get an idea of  how the uniform folded up on her body and have a face to work with.

I’ve never been particularly happy with the way I portrayed her hair and the lack of neck shoulders; something to give some sort of context. I had seen a woman in town with her hair up in an interesting way and found out the style is called a French Braid.  A kind member of the Hair & Beauty staff at College showed me how the hair is arranged.  By the middle of June the bust looks like this – but I feel I need to soften off the hairstyle, especially at the rear, before preparing it for firing.

There has been another project bubbling away but that will have to wait for another day.

Inspired by….

Ed, my tutor, suggested that I consider making something for the Inspired by… gallery up on the North York Moors.  As the name suggests the work should be inspired by the moors.  I didn’t feel like making sheep or grouse and things like tractors are not really subjects for clay.  Then I thought that Katie Ventress the artist blacksmith would be ideal.  Katie lives and works on the east end of the moors and she had recently given a talk about her work to students at college.

Katie kindly agreed to me visiting her workshop to take some photographs and measurements with a view to making a 1/4 size model in clay.  If you visit her website, which do hope you do as she produces some stunning stuff in metal, her “about” page has a picture of her sitting on her anvil, which is perched on a large wooden block [the block serves not only to get the height right but also to cushion rebound from the anvil].  The picture seemed a good place to start; her petite form with heavy tools of her work.

I was going to use pizza oven clay that has a heavy grogg, which tends to aid building up but limits the amount of detail that one can produce.  However, it had all gone by the time I wanted to start so I used a finer clay.  In the first couple of days and I had completed the block and anvil and they have been fired since this picture was taken and came out without breakage.

Overall, I’ve spent about 40 hours modelling – and if I’d got it right first time the number of hours would have been much smaller.

The bit of stuff on the lap is cling film used as a barrier between the hands and thighs so they can move – and not tear or crack at the wrists with uneven shrinkage – and the stick was to help form a hole for a hammer handle after firing.

There’s lots more to do with regard to colouring the piece after its bisque firing and I shall let know how I get on..


Up and coming

For the end of February and beginning of March I was in Amsterdam, looking after Izzie; Ben, Alice and Lottie’s Hungarian Vizsla while they were away skiing.  Had a great time museums and walking and this is a picture of us when we were in Jakarta.

Since I got back, I’ve been pottering on several things but none are really in a state that I want to share.  I’ve been really good at making mistakes cutting with a chainsaw – funny how hard I found it to cut straight and square!  Moreover, I’ve repeatably managed to be too enthusiastic with the larger woodworking gouges which has necessitated taking off far more wood than I had originally planned.  One possible work gave way to another, as the block became too small for the previous idea, and now the block is progressing but is in a state far from completion.

However, the reason for this post is Lottie and Izzie.  Lottie likes making things, so while in Amsterdam, their new home, I bought some Plastiline oil-based clay for Lottie.  It isn’t as messy as wet clay and doesn’t dry out.  Lottie was keen to work with it when they got back from skiing but like all clays, it cannot stand up thin and tall.  I came home and made an armature using the square-section wire sold for the purpose and sent it off.  This is what Lottie posted via WhatsApp with a request on how to do the paws.

I had put little black marks on the metal where the bottom of the paws would rest [I think that you can see them in the photo] and explained that leaving a gap between the wooden surface and where the “ground” would be makes it easier to model.  I think that she has made an excellent model of Izzie and really captured the set of Izzie’s body pointing at some animal, and I especially like the head, the balance of muzzle to floppy ears.  Next up, Lottie says that she would like to try and make a pegasus and I’m still pondering on how to make a successful armature for the wings on scale similar to the Izzie model.  Hopefully, I’ll solve that problem before Lottie’s eleventh birthday next month!


Same but different

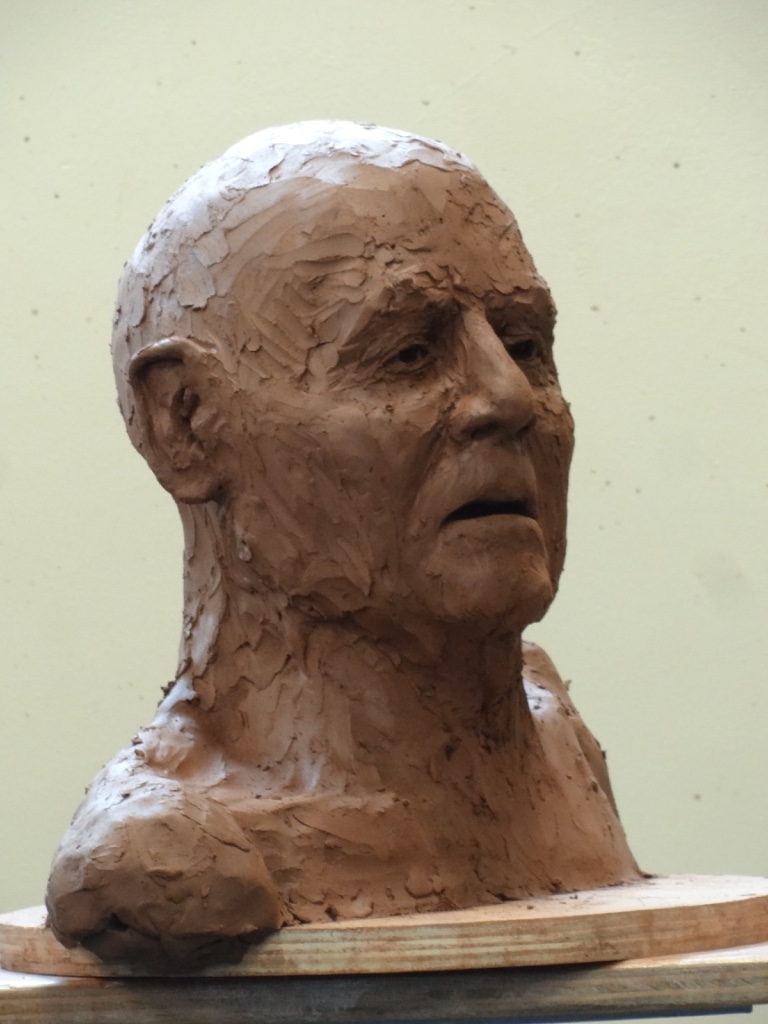
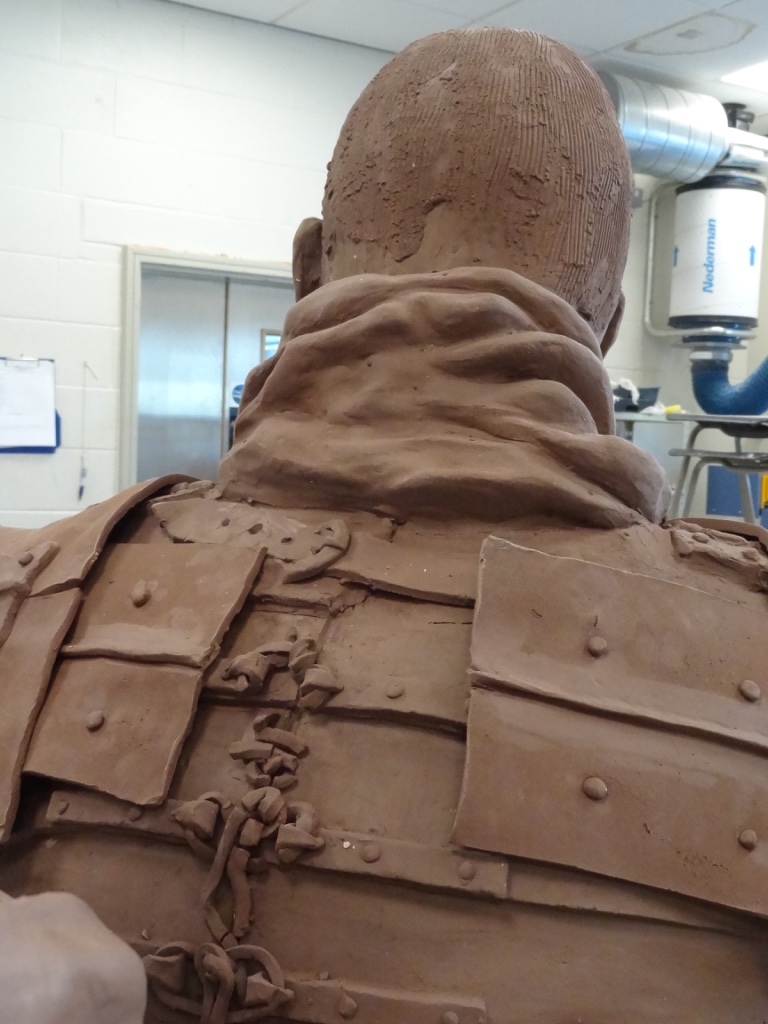
I was thinking about Medardo Rosso and his move to photographing his work rather than making more.  Here are six photos of a piece of mine; the lighting stayed the same [the piece was only turned] but the pics on the left  were shot from less than a metre away and those on the right from two and a bit metres.  I tried to keep the centre of the lens on the centre of the piece and cropped very close in the camera to the top and bottom of the subject.

               On the left the bottom of the brick is distorted and the head has an air of “chin up” while on the right he may look little bit grumpy or stern.

              Again, the brick is distorted, the chin looks tipped up and perhaps looks less stern than the face on the right.

          Finally, the picture on the left has a distorted brick and, perhaps, a slightly enquiring look compared to the more solid presence on the right.

These differences come about from adjusting distance to subject, diminishing distortion with distance but being closer gives an artificial tip to the head away from the camera and leads one to see things differently.  Such differences are difficult to notice for the human eye as we naturally adjust [and our field of view is far greater], but nevertheless closeness to a work alters how you see it [and not just in terms of detail].

Michael Baxandall, in his book “The Limewood Sculptors of Renaissance Germany”, talks about the arc of address and the beam of attention for a sculpture; the arc of address being the angle through which one can see the work and the beam of address being the main axis on which to view the work.  Baxandall was considering the works in their chosen environments, niches or altars, etc. in churches, where the vertical distance from the work was set.  If one is on the beam of attention, the closer one gets to the work, the less one sees of the forehead and hair.  However, I assume that when a worshipper is close to the statue and looking up, they will still hope to see the trappings of holiness [crowns, halos, perhaps a hovering angel too] and hair.  But closeness seems to “tip” the head back and features of the upper head visible from further away would not be seen close up – unless the sculptor tipped the head down.  Moreover, without tipping, the eyes would be looking afar and the worshipper would have nostrils to look up.  If the head is tipped too far down, for better viewing close up, it will not read well from further away.  Perhaps, devotional sculptures have  the trappings of holiness sitting towards the front of the head [or the depth of head from brow ridge to hairline is subtly reduced].  This matter looks like something to discuss at the upcoming conference in March at the Henry Moore Institute in Leeds on Medieval Sculpture.

Ha!  I should have gone back to Baxandall’s book and looked the pictures; problems seems to have been solved by turning the head to the side slightly and down. So, from afar, still see features of side of face and close up chance to look up at face.  Another option was keep head facing ahead but lower gaze – often seated Virgin with Jesus on her lap so her gaze passed him onto close worshipper but from afar still see all of face.

Inspired by Medardo Rosso

Got back to modelling in the round today and trying to pick up something from Medardo Rosso, particularly his work “Bambino al sole” [see his work now at  Galerie Thaddeus Ropac , London].  Think the only similarities are that it’s a baby wrapped up, no eyes modelled, and relies on lighting from above. I’ve used Plaxtin oil-based clay again to see how comfortable I am with the smell and the oil smears on my hands.

The first picture was taken in Jill’s studio and the rest in mine.  Plan is to make a mould and then some copies which I would hope to sell.

York Garrison Memorial: Part 2

It’s a month since the last post on this subject and I have got a long way forward with the modern female soldier and added a few touches to the roman].  These photos are a selection from the ones the college photographer took and my own: I haven’t made attempts to edit them as they were all taken yesterday and we fly out today to Indonesia [all very exciting but not really about my “journey into craft”].


Hopefully they will survive and not dry out too much over the festive break!

College Live Project

There is a cycle path that runs from south York for a long way towards Selby.  It sits on the old path of the East Coast Mainline railway, which was moved in the 70s to avoid the possibility of subsidence from working the Selby coalfield.

There is some money around for sculptures at the ends of the path or along its course and the live project was to consider what one might put up.  Here are the maquettes for my main ideas.

This idea was a slab of rusting steel having a map of the area on one side and coal miners in relief on the other; the cut throughs being where there are underground workings [data from the coal authority].

These two are ideas for seating along the route; stylised railway carriage which has concrete seats [enough to rest on but not encouraging a very long stay] and the profile of rail track turned up side down and enlarged so that the thick “top” becomes slightly sloping seating.  They’d probably be enough vertical flat wall to mount information boards.

Whether anything comes of the project remains to be seen….